Wednesday, November 18, 2009

Small Green Project - Recycling

Living out in the country is great! But I do have to trade a few city conveniences for our homestead. One of those is curbside recycling. If you live in town, recycling requires little effort, but in the country it requires a bit of dedication. We recycle everything we can and have only a small kitchen garbage bag of trash a week. We recycle veggie food scraps, coffee grounds, a bit of paper and paperboard tubes in the compost pile. We recycle 1-7 plastics, all colors of glass, steel cans, paper, cardboard and paperboard by taking it to a recycling dropoff center outside Prairie Grove. I take the aluminum to Vaughn Battery and Recycling. The price per pound for aluminum varies but each trip to vaughn helps pay for the next case of beer! The bins you see here are our recycle bins. I have a small crate in the house where we collect the recycling, then once a week I move it out to the shop and sort into these bins. Then about once every 6 weeks I'll take a truck load to the recycling center. City curbside recycling is convenient, but they don't necessarily take all types of recyclable material. Most in our area only accept #1 and #2 plastics, however the drop off center outside prairie grove accepts all 7 plastic resin code types. If your local pickup doesn't include all plastics or has other restrictions look for a self-service drop-off point in your area. This will allow recycling of much more material than a curbside pickup, such as yogurt and "butter" tubs, ketchup, mustard, honey, and medicine bottles, cd jewel cases, and thousands of other products that would otherwise go into a landfill.

Here are some links if you are thinking of recycling too!
http://www.ides.com/resources/plastic-recycling-codes.asp  - List of plastic resin codes and products made from recycled plastics
http://www.bmswd.com/recyclin.htm - Boston Mountain Solid Waste District recycling centers
http://www.bcswd.com/drop-off.htm - Benton County Solid Waste District recycling centers
http://www.fcsolidwaste.com/recyclinglocations.html - Faulkner County Solid Wast District recycling center
http://www.adeq.state.ar.us/solwaste/branch_recycling/ - Arkansas Department of Environmental Quality recycling branch
http://www.epa.gov/epawaste/wycd/catbook/index.htm - EPA's consumers guide to reducing solid waste

Sunday, November 8, 2009

Small Green Project - Solar powered pathway lights

Stumbling around in the dark can be dangerous. You never know where you might step. Having your walking paths lit can prevent a fall or at least you can see where you will hit the ground. Solar powered path lights are a simple way to illuminate any path around your house. They require no wiring so installation is as simple as putting a stake in the ground. The top of the light has a small solar panel that charges a rechargable AA battery. I've put in two sets of lights, one by the shop building and the other set in the rose beds along the front of the house. They are fairly inexpensive and can be purchased in large packs at Sam's club. You can get solar pathway lights at any hardware store, discount store and even harbor freight tools. The only maintenance involved is to occasionally clean the dirt that will accumulate on solar panels and to prune any bushes that will block the solar panels from sunlight.

Tuesday, October 27, 2009

Small Green Project - Composting


If you grow your own garden, or grow any kind of plant, you can benefit from compost. Compost is decomposed organic matter. All organic matter decomposes and those materials provide nutrients and growing medium for plants. In a compost pile we are trying to speed up the natural process of decomposition. By providing an optimal environment for the microorganisms, insects and worms the material can be decomposed in a few months rather than a year or more in the natural decompostion process. The decomposition we want in our compost pile is aerobic decompostion. That is, we want our materials to decompose in the presence of air. anaerobic decomposition is more useful in biodigestors for the production of methane gas. Anaerobic decomposition is what is responsible for the foul smell that can come from a compost pile if not properly maintained. In order to maintain your compost pile you need three things: 1. organic material 2. water 3. air. The ratio of carbon and nitrogen is  important in your organic material and can be maintained by putting a variety of materials into your compost pile. If you put mostly yard wastes that are high in nitrogen as I do, you can add high carbon materials, such as shredded paper (think junk mail) or paper roll tubes to balance things out and keep the pile healthy and decomposing quickly. You need to also keep the pile moist. The air come from turning the compost pile on a regular basis. If you don't have the room for compost piles in your yard, barrel composters and small worm bin composters are available to buy or build and all provide valuable nutrients for your plants!

Here are some links if you are thinking about a composting too:

http://www.adeq.state.ar.us/solwaste/branch_technical/compost.htm  - Arkansas Department of Environmental Quality site on composting


http://www.arhomeandgarden.org/composting.htm - UA's Cooperative Extension composting site

http://whatcom.wsu.edu/ag/compost/Easywormbin.htm - Build your own worm bin composter

Sunday, October 11, 2009

Large Green Project - Energy Efficient Heat Pump Replacement

During August the first year we lived in the country our undersized heat pump failed. It was hot, we were unhappy, it wasn't fun! Small holes throughout the system prevented keeping a refrigerant charge. The coil was rusted and had to be replaced. It was going to be a costly repair, and the system was undersized for the house and wasn't very efficient. I decided we should upgrade the existing heat pump with a new more energy efficient model and add an extra vent and return air duct. We chose a lennox XP 16 heat pump. What is a heat pump? It's an air conditioner and furnace all-in-one. During the summer it extracts the heat from the inside air to make it cooler and in the winter it extracts the heat from the outside air to heat the inside air. Yes, even in the winter there is still enough heat in the air to extract to heat your home. It just gets less efficient the colder it gets. But in moderate climates they can be more energy efficient than a separate air conditioner and furnace. We also have a wood burning stove that offsets the demand from the heat pump in the winter. Having dual sources for heat or a constant temperature source such as geothermal makes a heat pump a good choice for heating and cooling your home. Our unit has a SEER rating of 17. SEER is the Seasonal Energy Efficiency Ratio. The higher the number the more energy efficient the system is or the more money you save when using the system. The system cost about $5100 installed and included a new duct and air return in another part of our home. The heat pump qualified for the energy efficiency tax credit and has lowered our energy usage by an average of 400 kWh per month.

Here are some links if you are thinking of an energy efficient heat pump:
http://www.lennox.com/products/heat-pumps/XP16/ - here is the heat pump we got.
http://en.wikipedia.org/wiki/Geothermal_heat_pump - information on geothermal heat pump systems. Geothermal is an attractive option for a heat pump especially if you don't have a supplemental heat source and they are available in our area!

Tuesday, September 29, 2009

Medium Green Project - FSC certified Wood Tiles


I put in a small hot tub earlier this year. I've mistreated my back in years past and from time to time I'm reminded of my past transgressions, so I convinced my wife a hot tub would be therapeutic and voila! A short soak and a good glass of vino is a nice way to unwind in the evenings, but I digress. I realized after a couple of months that I needed a patio covering that is easier on the feet than concrete and didn't let me track grit into the house. I had seen wooden tiles on a DIY show, but wasn't sure where to get them. A few internet searches later and I found these. They are FSC certified eucalyptus wooden tiles from Vifah manufacturing. They snap together and can be taken apart and re-assembled just about anywhere. They have a plastic plaform that raises the wood above grade to let the water shed away, and since they are installed on our back porch there is already a slope away from the house to shed water. The tiles are oiled from the manufacturer and as you can see from my pic they need to be sealed once a year or they will weather grey. Use any wood sealer such as what you would use for your deck. FSC stands for Forest Stewardship Council. It is a non-profit organization advocating and certifying wood products that come from responsibly managed forests. The tiles are about $3.50 per square foot. They are a little expensive but wear well and look great. You can also find refurbished tiles cheaper and they are sold in larger lots at a discount.

Here are a few links if you are thinking of wooden tiles:
http://www.fsc.org/ - Forest Stewardship Council website
http://www.decktiles.org/ - Vifah's retail website

Tuesday, September 22, 2009

Small Green Project - Recycled Rubber Path


I have a stepping stone path around my shop that leads from our patio to the trash and aluminum recycling cans. Rather than putting in an organic mulch around the pavers that would break down and need to be replaced, or rock that would retain heat and be less comfortable to walk on, I decided I would try a relatively new product available at most home-improvement stores: recycled rubber mulch. It is available in 2 colors, red and earth tone (dark brown). It is soft to walk on and is guaranteed to last and be colorfast for 15 years. It is made of 100% recycled rubber. I haven't been able to find what the rubber source is,but nontheless it is recycled rubber and whatever we can keep out of the landfills the better. It is more expensive than traditional mulch, running around $12 per bag, but you don't have to re-mulch every year. Wal-mart and sam's club have started carrying the mulch and it is priced cheaper than the home improvement stores. I've been pleased with the mulch so far this year and am planning on a rubber mulch walkway around my raised beds next year.

Here are a couple of links if you are thinking of recycled rubber mulch:
http://www.internationalmulch.com/ - another rubber mulch manufacturer
http://www.americanrubber.com/mulch/ - here is a rubber mulch that is made from recycled tires (sold at sam's clubs)

Sunday, September 20, 2009

Medium Green Project - Solar Attic Fan

Well, I've done it. I cut a hole in the roof today and installed a 10 watt solar powered attic fan. I already have a 10 watt solar powered gable vent fan, (earlier post) but the gable vent fan wasn't quite enough ventilation for the hot attic air. 1 -20 watt fan or 2 -10 watt fans are recommended for my roof size and pitch. My roof it L-shaped and the gable vent fan is installed at the top of the "L". The attic fan I installed today is in the middle of the bottom of the "L". That allows the fan to expel hot air from that section of the attic and pull in fresh air from the north and south gable and soffit vents. Like the gable vent fan, the attic fan has a thermostatic switch controlling when the fan turns on. When the attic air temp rises above 80 degrees the fan switches on and switches off when the temperature falls below 70 degrees. That should allow the fan to run most of the year but stay off in the dead of winter. As I wrote in the gable vent fan post the ideas behind adequate attic ventilation are lower energy costs for cooling,because the temperature differential between the inside and outside temps are lower, as well as slowing the deterioration of the roof from the lower temperatures and lower humidity in the attic. While I was in the attic today I located a spot above our kitchen where I can install our tubular skylight. Look for that post soon! The total time to install was a couple of hours and the cost for the fan was about $320. The fan does qualify for a 30% tax credit for photovoltaic systems.
Here are some links if you are thinking about a solar attic fan:
http://www.solaratticfan.com/ - this is the company that makes the fan.
http://www.infinigi.com/ - this is where I got the fan.
http://www.dsireusa.org/ - Federal and State tax incentives

Wednesday, September 16, 2009

Small Green Project - Gardening

This post focuses on a passion for many, a chore for some, but an enjoyable pastime for me and at least some of you. Gardening is good for each of us that endeavors in the pastime. It is a low impact exercise, it provides healthy whole foods for consumption and it reduces the amount of money we pay to have vegetables shipped across the country to feed us. This spring I put in two 4' x 8' raised beds. I plan to add 1 or possibly 2 more raised beds next year. The beds were built from railroad ties and I added horse manure, topsoil and homegrown compost (post coming soon) This year we grew: grape,cherry, lemon boy, Arkansas traveler, and early girl tomatoes, as well as yellow squash, cucumbers, yellow bell peppers, cantaloupe, okra, and vidalia onions. In our herb planters we grew genovese basil, flat leaf parsley, rosemary, peppermint, and banana peppers.

I just removed our tomato plants and bought some fall plants for the garden. I am planning to plant lettuce, cabbage, Swiss chard ,and possibly broccoli . Our current weather patten has been non-stop rain, so as soon as I have a day or two that's dry I'll plant our fall crops.

Late summer this year I added 3 raised beds for perennial food crops. In those beds I planted blueberries, raspberries, and a fig tree. I also planted a couple of apple and plum trees. These long term perennials and biennials will take 2 -3 years to produce fruits so it has been an investment in our future crops. Next year I plan on adding a few more fruit trees as well as some grapevines.

Needless to say, but I've been bit by the gardening bug!
I'm growing the garden without pesticides, using natural fertilizer (compost) and watering with collected rainwater.


Here are some links if you are thinking of gardening:

http://www.uaex.edu/ - UA Cooperative Extension

http://www.arhomeandgarden.org/ - UA Cooperative Extension Home and Garden site


http://www.organicgardening.com/

http://www.garden.org/home

http://www.gardenweb.com/

Thursday, September 3, 2009

Small Green Project - Clothesline

This blog entry chronicles one of my most controversial green projects to date. Not only was there a bit of controversy at the homestead about the project, but there is a national debate over the use of this device. Of course I'm talking about the old-fashioned clothesline. The same thing your grandma hung her clothes on to dry. My wife and I enjoy modern conveniences, especially those that save time or effort, so the clothesline versus the traditional dryer was a bit of a sell at our house. And since this age-old method of clothes drying requires a bit more effort, I've volunteered to hang the clothes out anytime the weather cooperates. My wife was skeptical at first, but is now coming around. Not only does the clothesline save energy, it also prevents a lot of unnecessary heat from being generated in the house, so the house has been a little cooler since we've embraced grandma's gadget. (not to mention we need less air conditioning to make up for the added heat). The nationwide controversy has to do with the supposed unsightliness of clotheslines and their prohibition in neighborhood covenants nationwide. Never did I suspect we would need a national advocacy group for the use of the clothesline, but here we are. Anyway I've included links below to read more about the controversy but here is why its green. Warning there is math ahead...
Here's my estimation:
Our dryer is all electric and uses 28A at 240v
28 * 240 = 6720 VA (volt amps)
6720 VA * .67 = 4502.4 W (Actual Power) This is the power correction
4502.4 / 1000 = 4.5 kW
4.5 kW * 4 hrs = 18 kWh per week
(assuming 4 loads per week and 1 hour drying time)
18 kWh * 52 weeks = 936 kWh per year
936 kWh / 12 = 78 kWh per month
78 kWh / 956.6 = 8 % of average household electricity consumption by our dryer

By cutting the dryer loads in half by using the clothesline at least 2 out of the 4 loads per week we save:
39 kWh per month
468 kWh per year
Depending on your average price for power that equates to a few cases of beer (or a few bottles of your favorite wine!)

The average household does about 7 loads of laundry a week.
That equates to 31.5 kWh per week,
1638 kWh per year,
136.5 kWh per month.
That equates to 14.2 % of average US household electricity consumption.
(National Average based on 2005 DOE report 11480 kWh / 12 = 956.6 kWh per month)

That's a lot of power!
We've been fairly successful with the clothesline so far this year (when its not raining) and have reduced our electricity usage and got clean fresh smelling clothes to boot! On another note, if you go all-out with the clothesline you can hang clothes inside in the winter adding humidity to the air for a more comfortable house! The clothesline we got was from Lowe's and cost about $30. Retractable lines and traditional lines can be even less expensive.

Here are some links if you are thinking about a clothesline yourself:

http://www.eia.doe.gov/emeu/recs/recs2005/c&e/summary/pdf/tableus8.pdf - DOE PDF

http://www.eia.doe.gov/emeu/recs/recs2005/c&e/detailed_tables2005c&e.html - More DOE information

http://www.laundrylist.org/index.php/faq/35-general-laundry-questions/101-kwh-year-dryer-average - average laundry usage

http://www.laundrylist.org/ - advocacy group, video clips at bottom

Monday, August 31, 2009

Small Green Project - Solar Screens


The south face of my house has 3 large windows and no trees for shading which is great for solar panels and heat gain in the winter, but not so great in the summer. My first thought to reduce the solar gain in the summers was to put up awnings. Awnings are a great permanent way to block the sun when its high in the summer and let it in when its lower in the winter. The only problem I had with awnings was the permanent part. I've been considering a screened porch on the south side of the house but I haven't arrived at a location. So I next considered the solar films that you can put in the windows to block the UV radiation and excess heat. But I wanted something I could re-use for a few years until I've settled on a screened porch, deciduous trees, or awnings. Deciduous trees are recommended for house shading because they lose their leaves in the winter but provide shade in the summers. Needless to say as the title suggests I picked solar screens to help block UV radiation and a large amount of heat. I picked up the screen material and frame pieces at Lowe's. The screen material was about $14 and the frame kit was about $12 each. Other than that you need a screening tool to compress the spline into the frame and some screen clips to hold them on the house. After completing the first screen I installed it and measured the temperature of the window sill with the screen versus the sill without the screen and found the screened sill was 10 degrees cooler! We've noticed a big difference this past month in our den which has the most glazing in the house and is typically warmer than any other rooms. As soon as winter arrives they will come down and let some heat back in.

Sunday, August 30, 2009

Medium Green Project - Rain Water Catchment System

I put in a couple of raised beds this year for our vegetable garden and what better way to irrigate a garden than a rain barrel or rain water catchment system. Rather than putting in a single rain barrel off the side of our house, I thought I needed more water for the garden and chose to put in a system of rain barrels that would provide all the water my garden needs.
I did some research online and found that the best bet for my system was to capture the rain water off of my shop metal roof and use that for irrigation. There is an on-going debate as to the "cleanliness" of rain water gathered off asphalt shingle roofs versus a metal roof. So in the off-chance that I decide to put in an ultra-violet light and filter system to make the rain water potable (drinkable) I decided to capture water off of my shop roof (metal) and put it to work in my garden. This also hides the rain barrels behind my shop. I bought 4 - 55 gallon drums from hogeye rentals for $13 each. They are food grade 55 gallon drums that I washed out with water and a mild bleach solution. Then I put in guttering on the back of my shop. Thanks Glen! I needed help putting up the gutters and Glen volunteered. Then I built a 4 ft. platform for the barrels. My father-in-law came for a visit while I was building the platform and was recruited to help. Thanks Bill! I figured based on my research that water builds 1.5 PSI per foot of elevation, so with 7 feet of elevation I should have about 10.5 PSI with full barrels which should push the water where I needed. This worked well for short distances, but my garden was about 150 feet away from the rain water catchment system, so realized I needed more than 10.5 psi. I picked up a small DC powered water pump at Harbor Freight tools. Then I bought a small lawn tractor battery, DC switch, battery box, and solar battery trickle charger at wally world. I wired them all together so I would have a water pump to push water out to my garden and viola! It worked! Now I have plenty of pressure to water my garden. The battery is topped off every day by the trickle charger so it rarely needs attention. I use the rain water system to water my 2 raised beds and herb planters everyday and water the fruit trees, and our plants on our front porch once a week. So far this year, I have had to water the garden from the house 3 days when we had a week or more of drought. The system has a "first-flush diverter" as part of the water catchment system. The first few gallons of water from the roof that washes the all of the gunk off the roof is stored in a 3" standpipe in the system, then slowly drains while the rest of the water is diverted to the 4 - 55 gallon storage tanks. The tanks are plumbed together at the bottom of each tank and combines at a single spigot. I've put screen at the top of the bung holes of the tanks to equalize pressure among the tanks and prevent mosquito infestation. The water has been adequate this year, but next year I'm planning on expanding the planting beds and will add to the system. This system cost a couple of hundred dollars for the guttering, barrels, platform, PVC piping and pump system.
Here are a few links if you are thinking about rain barrels of your own:
http://www.twdb.state.tx.us/publications/reports/RainwaterHarvestingManual_3rdedition.pdf - The Texas rainwater development board PDF on rainwater harvesting
http://www.hogeye.biz/ - Hogeye Rentals

Small Green Project - Compact Fluorescent Bulbs


I've changed our lights. I've moved almost all of our "old-fashioned" incandescent over to the "new-fangled" compact fluorescent light bulbs. They are still a little more expensive than incandescents, but wal-mart and other major retailers are selling them by the truck load and driving the prices down. Compact fluorescents as the name implies are fluorescent light bulbs similar to the bulbs commonly used in office and shop lighting. The ballast is contained in the base of the compact fluorescent and allows them to be used in traditional incandescent fixtures. They use much less electricity than incandescents and generate less heat than incandescents. The bulb here is a 13 watt compact fluorescent that has a light output similar to a 60 watt incandescent bulb. That's less than a quarter of the power required to get the same light output, now that's green. They are supposed to last longer than incandescents, and in our experience that is mostly true. I say "mostly" because I have had a couple go out. The dead bulbs were in use in our bathrooms multiple light fixtures. In our master bath we have a 6 bulb fixture and have lost 2 bulbs, and in our guest bathroom we have a 4 bulb fixture and have lost 1 bulb. I'm assuming it is the fixture and not the bulbs that are the problem, but we'll see. Other than the bathroom light fixtures all our lamps have CFL's and they have lasted a couple of years without any failures. One thing to keep in mind when you switch to a CFL is that it is considered hazardous household waste and should not be disposed of in your trash. There is a small amount of mercury in them and that requires proper disposal by dropping them off at your local hazardous waste drop off point.
Another note about CFL's is the warm up time. Inside this is not an issue, but if you want to use them in motion-activated security lights to chase away, say, deer or other critters that are dining on your plants at night, they may not be the best choice. A slow warm-up light like a CFL doesn't really have the "scare-away" potential as an incandescent instant-on light. But all in all CFL's have a place in our greener homes, and as soon as LED lights are cheap enough to replace our CFL's we won't have to think about mercury disposal.
Here are some links if you are thinking about CFL's"
http://en.wikipedia.org/wiki/Compact_fluorescent_lamp - wikipedia article
http://www.energystar.gov/index.cfm?c=cfls.pr_cfls - energy star website

http://www.bmswd.com/hhw.htm - Where to take Household hazardous waste
http://www.co.washington.ar.us/EnvironmentalAffairs/ - Washington County Environmental Affairs & Recycling

Saturday, August 29, 2009

Medium Green Project - Solar Gable Vent Fan

Summers in Arkansas can be hot, very hot. Uncomfortably mind-numbingly, nature is trying to kill you hot. Oh, and the humidity sucks too. Fortunately for all of us in the south this summer and last summer weren't as hot as normal. So during our brief respite of summer evil, I decided to put some powered ventilation in our attic space. Naturally, I wanted to try a greener system so I looked at solar powered ventilation fans. We all know that the attic can be a hot space and that the heat in our attic reduces the life of our shingles and reduces the effectiveness of our insulation making cooling systems work harder. Imagine a normal 90 degree day outside, in our attic the temperature could get as high at 150 degrees. This makes your air conditioner work harder than it needs to. Hence we have ventilation in our attic. Most ventilation that you see is passive. Whirly birds, soffit vents, gable vents, ridge vents, and roof vents are passive cooling systems or a way to get air in and out of the attic space that don't require a power source. AC or DC powered gable fans, whole house ventilators, and powered roof vents are active cooling sources for your attic. I chose to go with a gable mounted solar powered ventilation fan. I have 3 gable vents in our house and I thought it would be a good idea to mount a fan in one of them. I had to build a frame surrounding the gable vent, and once that was done the installation was fairly easy. You have to seal as many possible air leaks around the fan housing so it takes a bit of caulking to get it done, but the more leaks you seal the more efficient the fan will be, meaning the more hot air it will push out of your attic. I decided to add a thermostatically controlled swith to the fan so it will only come on once the air temperature is above 80 degrees and will shut off when the temperature is below 70 degrees. This prevents the unit from running in the winter when we don't need it. I put in a 10 watt system. It has a 10 watt solar panel on the roof that powers the fan. the fan can move 850 cfm which is a fair amount of air. I have a larger roof than what is recommended for this fan alone, and am planning on adding a 10 watt solar powered attic fan to supplement this system. I have a T-shaped roof and wanted to spread the work load out so I wasn't pulling hot air from one end of the attic to the other. The system I put in cost about $320. Its definitely more expensive than a traditional gable vent fan, but it qualifies for the 30% federal tax credit and its powered by the sun, and how cool is that!
Here are some links if your thinking about attic ventilation:
http://www.dsireusa.org/ - State and Federal tax incentives
http://www.solaratticfan.com/ - the gable vent fan I put in
http://www.infinigi.com/ - a cool online store

Big Green Project - Solar Hot Water


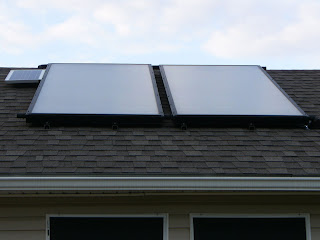
In Februrary of this year after a nine day power outage, I began to rethink how we get our utilities and how I could have more control of my own destiny, or at least my own power and water. I live out in the country and surprisingly I have no propane or natural gas. My home is all electric. I had an undersized electric water heater and was trying to decide if I should invest in a propane tank and all the plumbing to get the gas in my home as well as putting in a new larger propane water heater or a tankless water heater, or if I should invest in solar hot water. I decided to jump in feet first and went with solar hot water. I did research online and spoke to a few local installers/retailers of the equipment and decided what was best for our climate and situation is a closed loop, non-drainback solar water system. The closed loop part is a propylene glycol & water mixture ( so it won't freeze) that is pumped through 2 flat plate collectors (large panels above) on our roof then through a heat exchanger in our water tank in the house. The glycol mixture is pumped through the system with a small DC pump powered by a PV (photovoltaic) panel. (The small panel to the left of the collectors) So when the sun is shining and heating the glycol, it is carrying the collected heat to our water tank, and at night when the glycol cools it isn't pumped through the tank carying heat out. Inside, the glycol pump, glycol loop expansion tank, cold water expansion tank, shiny new 80 gal water tank and lots of copper piping and is housed. There is a small electric element in the top part of the tank as a backup for cloudy days. I also installed a temperature gauge on the incoming and outgoing glycol pipes to see how the system is running. So far on a really sunny day the incoming glycol temperature has reached a whopping 210 degrees. There is a tempering valve set at 140 degrees on the hot water output of the system. 140 degrees is the water temperature most dish washers run at so we typically don't have to re-heat water with the element in the dish washer.

The electric element in the water heater is set to 120 degrees so it only comes on when its been cloudy for quite a while or if I use a whole lotta hot water in the evening. We've had the system 6 months now and have seen a noticeable decrease in our electric bill. The major components of the system should last about 30 years so, once it has paid for itself we will have lots of free hot water. The system was expensive coming in over $7000. I could have gotten a cheaper system and installed it myself, but for my wife's piece of mind, we had it professionally installed.

There is a 30% tax credit for solar water and photovoltaic systems that will help come tax time, but yes, it was costly, but definitely worth it!

Here are some handy links if you are thinking solar water:

http://www.dsireusa.org/ - this is a national database of state and federal tax incentives

http://www.suncityenergy.com/ - this is the company where we got our system

http://en.wikipedia.org/wiki/Solar_water_heating - wikipedia article on solar hot water

http://www.altestore.com/store/ - a cool online store