Monday, August 31, 2009

Small Green Project - Solar Screens


The south face of my house has 3 large windows and no trees for shading which is great for solar panels and heat gain in the winter, but not so great in the summer. My first thought to reduce the solar gain in the summers was to put up awnings. Awnings are a great permanent way to block the sun when its high in the summer and let it in when its lower in the winter. The only problem I had with awnings was the permanent part. I've been considering a screened porch on the south side of the house but I haven't arrived at a location. So I next considered the solar films that you can put in the windows to block the UV radiation and excess heat. But I wanted something I could re-use for a few years until I've settled on a screened porch, deciduous trees, or awnings. Deciduous trees are recommended for house shading because they lose their leaves in the winter but provide shade in the summers. Needless to say as the title suggests I picked solar screens to help block UV radiation and a large amount of heat. I picked up the screen material and frame pieces at Lowe's. The screen material was about $14 and the frame kit was about $12 each. Other than that you need a screening tool to compress the spline into the frame and some screen clips to hold them on the house. After completing the first screen I installed it and measured the temperature of the window sill with the screen versus the sill without the screen and found the screened sill was 10 degrees cooler! We've noticed a big difference this past month in our den which has the most glazing in the house and is typically warmer than any other rooms. As soon as winter arrives they will come down and let some heat back in.

Sunday, August 30, 2009

Medium Green Project - Rain Water Catchment System

I put in a couple of raised beds this year for our vegetable garden and what better way to irrigate a garden than a rain barrel or rain water catchment system. Rather than putting in a single rain barrel off the side of our house, I thought I needed more water for the garden and chose to put in a system of rain barrels that would provide all the water my garden needs.
I did some research online and found that the best bet for my system was to capture the rain water off of my shop metal roof and use that for irrigation. There is an on-going debate as to the "cleanliness" of rain water gathered off asphalt shingle roofs versus a metal roof. So in the off-chance that I decide to put in an ultra-violet light and filter system to make the rain water potable (drinkable) I decided to capture water off of my shop roof (metal) and put it to work in my garden. This also hides the rain barrels behind my shop. I bought 4 - 55 gallon drums from hogeye rentals for $13 each. They are food grade 55 gallon drums that I washed out with water and a mild bleach solution. Then I put in guttering on the back of my shop. Thanks Glen! I needed help putting up the gutters and Glen volunteered. Then I built a 4 ft. platform for the barrels. My father-in-law came for a visit while I was building the platform and was recruited to help. Thanks Bill! I figured based on my research that water builds 1.5 PSI per foot of elevation, so with 7 feet of elevation I should have about 10.5 PSI with full barrels which should push the water where I needed. This worked well for short distances, but my garden was about 150 feet away from the rain water catchment system, so realized I needed more than 10.5 psi. I picked up a small DC powered water pump at Harbor Freight tools. Then I bought a small lawn tractor battery, DC switch, battery box, and solar battery trickle charger at wally world. I wired them all together so I would have a water pump to push water out to my garden and viola! It worked! Now I have plenty of pressure to water my garden. The battery is topped off every day by the trickle charger so it rarely needs attention. I use the rain water system to water my 2 raised beds and herb planters everyday and water the fruit trees, and our plants on our front porch once a week. So far this year, I have had to water the garden from the house 3 days when we had a week or more of drought. The system has a "first-flush diverter" as part of the water catchment system. The first few gallons of water from the roof that washes the all of the gunk off the roof is stored in a 3" standpipe in the system, then slowly drains while the rest of the water is diverted to the 4 - 55 gallon storage tanks. The tanks are plumbed together at the bottom of each tank and combines at a single spigot. I've put screen at the top of the bung holes of the tanks to equalize pressure among the tanks and prevent mosquito infestation. The water has been adequate this year, but next year I'm planning on expanding the planting beds and will add to the system. This system cost a couple of hundred dollars for the guttering, barrels, platform, PVC piping and pump system.
Here are a few links if you are thinking about rain barrels of your own:
http://www.twdb.state.tx.us/publications/reports/RainwaterHarvestingManual_3rdedition.pdf - The Texas rainwater development board PDF on rainwater harvesting
http://www.hogeye.biz/ - Hogeye Rentals

Small Green Project - Compact Fluorescent Bulbs


I've changed our lights. I've moved almost all of our "old-fashioned" incandescent over to the "new-fangled" compact fluorescent light bulbs. They are still a little more expensive than incandescents, but wal-mart and other major retailers are selling them by the truck load and driving the prices down. Compact fluorescents as the name implies are fluorescent light bulbs similar to the bulbs commonly used in office and shop lighting. The ballast is contained in the base of the compact fluorescent and allows them to be used in traditional incandescent fixtures. They use much less electricity than incandescents and generate less heat than incandescents. The bulb here is a 13 watt compact fluorescent that has a light output similar to a 60 watt incandescent bulb. That's less than a quarter of the power required to get the same light output, now that's green. They are supposed to last longer than incandescents, and in our experience that is mostly true. I say "mostly" because I have had a couple go out. The dead bulbs were in use in our bathrooms multiple light fixtures. In our master bath we have a 6 bulb fixture and have lost 2 bulbs, and in our guest bathroom we have a 4 bulb fixture and have lost 1 bulb. I'm assuming it is the fixture and not the bulbs that are the problem, but we'll see. Other than the bathroom light fixtures all our lamps have CFL's and they have lasted a couple of years without any failures. One thing to keep in mind when you switch to a CFL is that it is considered hazardous household waste and should not be disposed of in your trash. There is a small amount of mercury in them and that requires proper disposal by dropping them off at your local hazardous waste drop off point.
Another note about CFL's is the warm up time. Inside this is not an issue, but if you want to use them in motion-activated security lights to chase away, say, deer or other critters that are dining on your plants at night, they may not be the best choice. A slow warm-up light like a CFL doesn't really have the "scare-away" potential as an incandescent instant-on light. But all in all CFL's have a place in our greener homes, and as soon as LED lights are cheap enough to replace our CFL's we won't have to think about mercury disposal.
Here are some links if you are thinking about CFL's"
http://en.wikipedia.org/wiki/Compact_fluorescent_lamp - wikipedia article
http://www.energystar.gov/index.cfm?c=cfls.pr_cfls - energy star website

http://www.bmswd.com/hhw.htm - Where to take Household hazardous waste
http://www.co.washington.ar.us/EnvironmentalAffairs/ - Washington County Environmental Affairs & Recycling

Saturday, August 29, 2009

Medium Green Project - Solar Gable Vent Fan

Summers in Arkansas can be hot, very hot. Uncomfortably mind-numbingly, nature is trying to kill you hot. Oh, and the humidity sucks too. Fortunately for all of us in the south this summer and last summer weren't as hot as normal. So during our brief respite of summer evil, I decided to put some powered ventilation in our attic space. Naturally, I wanted to try a greener system so I looked at solar powered ventilation fans. We all know that the attic can be a hot space and that the heat in our attic reduces the life of our shingles and reduces the effectiveness of our insulation making cooling systems work harder. Imagine a normal 90 degree day outside, in our attic the temperature could get as high at 150 degrees. This makes your air conditioner work harder than it needs to. Hence we have ventilation in our attic. Most ventilation that you see is passive. Whirly birds, soffit vents, gable vents, ridge vents, and roof vents are passive cooling systems or a way to get air in and out of the attic space that don't require a power source. AC or DC powered gable fans, whole house ventilators, and powered roof vents are active cooling sources for your attic. I chose to go with a gable mounted solar powered ventilation fan. I have 3 gable vents in our house and I thought it would be a good idea to mount a fan in one of them. I had to build a frame surrounding the gable vent, and once that was done the installation was fairly easy. You have to seal as many possible air leaks around the fan housing so it takes a bit of caulking to get it done, but the more leaks you seal the more efficient the fan will be, meaning the more hot air it will push out of your attic. I decided to add a thermostatically controlled swith to the fan so it will only come on once the air temperature is above 80 degrees and will shut off when the temperature is below 70 degrees. This prevents the unit from running in the winter when we don't need it. I put in a 10 watt system. It has a 10 watt solar panel on the roof that powers the fan. the fan can move 850 cfm which is a fair amount of air. I have a larger roof than what is recommended for this fan alone, and am planning on adding a 10 watt solar powered attic fan to supplement this system. I have a T-shaped roof and wanted to spread the work load out so I wasn't pulling hot air from one end of the attic to the other. The system I put in cost about $320. Its definitely more expensive than a traditional gable vent fan, but it qualifies for the 30% federal tax credit and its powered by the sun, and how cool is that!
Here are some links if your thinking about attic ventilation:
http://www.dsireusa.org/ - State and Federal tax incentives
http://www.solaratticfan.com/ - the gable vent fan I put in
http://www.infinigi.com/ - a cool online store

Big Green Project - Solar Hot Water


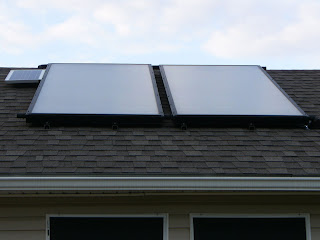
In Februrary of this year after a nine day power outage, I began to rethink how we get our utilities and how I could have more control of my own destiny, or at least my own power and water. I live out in the country and surprisingly I have no propane or natural gas. My home is all electric. I had an undersized electric water heater and was trying to decide if I should invest in a propane tank and all the plumbing to get the gas in my home as well as putting in a new larger propane water heater or a tankless water heater, or if I should invest in solar hot water. I decided to jump in feet first and went with solar hot water. I did research online and spoke to a few local installers/retailers of the equipment and decided what was best for our climate and situation is a closed loop, non-drainback solar water system. The closed loop part is a propylene glycol & water mixture ( so it won't freeze) that is pumped through 2 flat plate collectors (large panels above) on our roof then through a heat exchanger in our water tank in the house. The glycol mixture is pumped through the system with a small DC pump powered by a PV (photovoltaic) panel. (The small panel to the left of the collectors) So when the sun is shining and heating the glycol, it is carrying the collected heat to our water tank, and at night when the glycol cools it isn't pumped through the tank carying heat out. Inside, the glycol pump, glycol loop expansion tank, cold water expansion tank, shiny new 80 gal water tank and lots of copper piping and is housed. There is a small electric element in the top part of the tank as a backup for cloudy days. I also installed a temperature gauge on the incoming and outgoing glycol pipes to see how the system is running. So far on a really sunny day the incoming glycol temperature has reached a whopping 210 degrees. There is a tempering valve set at 140 degrees on the hot water output of the system. 140 degrees is the water temperature most dish washers run at so we typically don't have to re-heat water with the element in the dish washer.

The electric element in the water heater is set to 120 degrees so it only comes on when its been cloudy for quite a while or if I use a whole lotta hot water in the evening. We've had the system 6 months now and have seen a noticeable decrease in our electric bill. The major components of the system should last about 30 years so, once it has paid for itself we will have lots of free hot water. The system was expensive coming in over $7000. I could have gotten a cheaper system and installed it myself, but for my wife's piece of mind, we had it professionally installed.

There is a 30% tax credit for solar water and photovoltaic systems that will help come tax time, but yes, it was costly, but definitely worth it!

Here are some handy links if you are thinking solar water:

http://www.dsireusa.org/ - this is a national database of state and federal tax incentives

http://www.suncityenergy.com/ - this is the company where we got our system

http://en.wikipedia.org/wiki/Solar_water_heating - wikipedia article on solar hot water

http://www.altestore.com/store/ - a cool online store